Artillery.io
The Artillery executor allows you to run Artillery tests with Testkube.
- Default command for this executor:
artillery - Default arguments for this executor command:
run<runPath>--dotenv<envFile>-o<reportFile>
Parameters in <> are calculated at test execution:
<runPath>- The directory containing the cloned Git repository.<envFile>-.envfile location, will be built from variables.<reportFile>- The path to the generated report calledtest-report.json.
See more at "Redefining the Prebuilt Executor Command and Arguments" on the Creating Test page.
- Artillery.io is an open-source performance testing toolkit used primarily to perform cloud-scale load testing.
- Artillery is designed to be both straightforward in configuration (YAML files), and powerful.
Test Environment
Let's assume that our SUT (Service Under Test) is an internal Kubernetes service which has
ClusterIP Service created and is exposed on port 8088. The service name is testkube-api-server
and is exposing the /health endpoint that we want to test.
To call the SUT inside a cluster:
curl http://testkube-api-server:8088/health
Output:
200 OK
Create a Test Manifest
The Artillery tests are defined in declarative manner, as YAML files.
The test should warm up our service a little bit first, then we can hit a little harder.
Let's save our test into test.yaml file with the content below:
config:
  target: "http://testkube-api-server:8088"
  phases:
    - duration: 6
      arrivalRate: 5
      name: Warm up
    - duration: 120
      arrivalRate: 5
      rampTo: 50
      name: Ramp up load
    - duration: 60
      arrivalRate: 50
      name: Sustained load
scenarios:
  - name: "Check health endpoint"
    flow:
      - get:
          url: "/health"
Our test is ready, but how do we run it in a Kubernetes cluster? Testkube will help you with that!
Let's create a new Testkube test based on the saved Artillery test definition.
Create a New Testkube Test
If you want to upload a test file directly (like in this example) you can use Dashboard, or CLI - depending on your preferences.
- Dashboard
- CLI
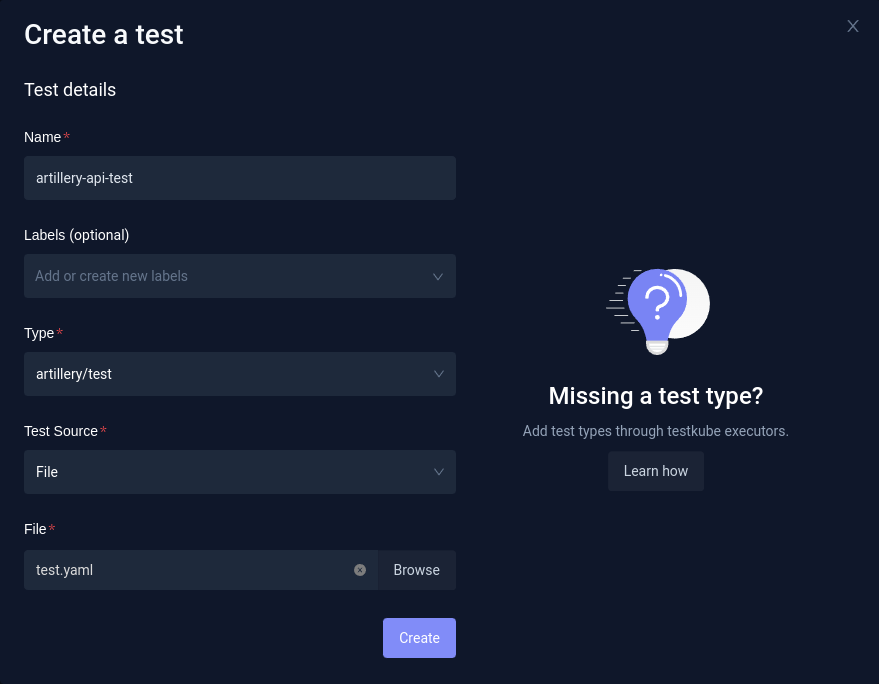
If you prefer to use the Dashboard, just go to Tests, and click the Add a new test button. Then you need to fill in the test Name, choose the test Type (artillery/test), Test Source (File, which allow you to upload specific file), and choose the File.

If you prefer using the CLI instead, you can create the test with testkube create test.
You need to set the test:
--name(for example,artillery-api-test)--type(in this caseartillery/test)--filewhich is a path to your test file (in this casetest.yaml)
testkube create test --name artillery-api-test --type artillery/test --file test.yaml
Output:
Test created 🥇
Running a Test
$ testkube run test artillery-api-test
Type:              artillery/test
Name:              artillery-api-test
Execution ID:      63ee9ca6872e05f0ea790d73
Execution name:    artillery-api-test-1
Execution number:  1
Status:            running
Start time:        2023-02-16 21:14:14.451905194 +0000 UTC
End time:          0001-01-01 00:00:00 +0000 UTC
Duration:


Test execution started
Watch test execution until complete:
$ kubectl testkube watch execution artillery-api-test-1


Use following command to get test execution details:
$ kubectl testkube get execution artillery-api-test-1
You can also watch your test results in real-time with -f flag (like "follow").
Test runs can be named. If no name is passed, Testkube will autogenerate a name.
Getting Test Results
Let's get back our finished test results. The test report and output will be stored in Testkube storage to revisit when necessary.
testkube get execution artillery-api-test-1
ID:         63ee9cd8872e05f0ea790d76
Name:       artillery-api-test-1
Number:            1
Test name:         artillery-api-test
Type:              artillery/test
Status:            passed
Start time:        2023-02-16 21:15:04.979 +0000 UTC
End time:          2023-02-16 21:18:19.463 +0000 UTC
Duration:          00:03:14

...
... (long output)
...

All VUs finished. Total time: 3 minutes, 7 seconds

--------------------------------
Summary report @ 21:18:16(+0000)
--------------------------------

http.codes.200: ................................................................ 6330
http.request_rate: ............................................................. 33/sec
http.requests: ................................................................. 6330
http.response_time:
  min: ......................................................................... 0
  max: ......................................................................... 11
  median: ...................................................................... 0
  p95: ......................................................................... 1
  p99: ......................................................................... 2
http.responses: ................................................................ 6330
vusers.completed: .............................................................. 6330
vusers.created: ................................................................ 6330
vusers.created_by_name.Check health endpoint: .................................. 6330
vusers.failed: ................................................................. 0
vusers.session_length:
  min: ......................................................................... 0.9
  max: ......................................................................... 25.6
  median: ...................................................................... 1.3
  p95: ......................................................................... 3.3
  p99: ......................................................................... 9.5
Log file: /tmp/test-report.json


Test execution completed with success in 3m14.484s 🥇
Additional examples
Additional Artillery examples can be found in the Testkube repository here.